Friday 12 April 2024

"This is the way." Review: Lego Star Wars Ultimate Collector Series 75331 - The Razor Crest

January 1st brings out a Pavlovian response in many Lego collectors.  It's the day that the new Modular Building hits the shelves.  For Lego Star Wars fans, it's slightly different.  On the upside, their red letter day (usually) comes twice a year, but frustratingly the dates can drift about a bit.  'Early May' and 'Sometime in late Autumn' is about as firm as the dates usually get until there's an official announcement.


I am talking, of course, of the additions to the Lego Star Wars Ultimate Collector Series.  Stretching back to the summer of 2000, when 7191 X-Wing Fighter launched the theme, we've since had nearly 40 entries to the collection, with gems like the Millennium Falcon (twice, 75192 in 2017 and 10179 in 2007), 10212 Imperial Shuttle, 75313 AT-AT and 10225 R2-D2.


There have also been a few sets along the way that... didn't exactly raise the bar.  10186 General Grievous is surely one for the completist only, while 75098, Assault On Hoth is one for the masochist with too much money.


In 2022 we had Luke's Landspeeder appear in May - the umpteenth speeder to join the Lego Star Wars theme, but the first to be awarded the UCS label.  And then in October the subtheme took something of a swerve.  Up until this point, every 'Ultimate' set had been drawn from the Star Wars films, and indeed most came from the holy trinity of episodes IV, V and VI, with just a scant few coming from the prequel trilogy.


But the Star Wars team had cast their net a little further this time, and looked to the small screen rather than the cinema for inspiration.  Thus it was that The Razor Crest, home to the bounty hunter, Din Djarin, was immortalised in ABS.  Lifted from the very successful Disney TV Series 'The Mandalorian', currently on its third series, the Razor Crest - or an ST-70 Assault Ship as it probably says on the insurance certificate - is the sort of rusty, battered workhorse of a ship that is so beloved of Star Wars designers.  


The Razor Crest, taking up quite a bit of the dining room table


Well.  Except the ones who worked on The Phantom Menace, who wanted everything to look shinier than a shiny thing on shiny day (1).


Now many Lego websites will have produced a review at the time of release, back in October 2022, maybe even just before.  But most of them will have been sent a copy by the Lego Group.  Me, I have to buy my own stuff, and at £519.99, it was simply too expensive.  However, thanks to the company I used to work for having it on sale a while back and the fact that I still qualify for staff discount, the price came down to something rather more palatable.  And the sale was on my birthday.  I mean, that's basically the universe saying 'BUY IT!", right?


Well that's what I heard anyway.  So anyway.  That's why this review is somewhat late out of the blocks.


So what do we get for £519.99 (or however much you paid for it)?


This is a very large box indeed


You get a large box, with the now traditional image-on-a-black-background, containing two smaller boxes, each with what looks like concept artwork from the series rather than images of the set itself.  Inside are four manuals which cover the 48 bags of parts, numbered 1 - 36.  Manual two comes with the inevitable sticker sheet, but there are only 18 stickers in total, all of which go on fairly easily, with the exception of the large 'infopanel' sticker which still induces a shortness of breath and shaky hands.  Printed panels, like the one that came with 42143 Ferrari Daytona SP3, can't become the default too soon if you ask me.


Concept art on the inner boxes.  Ikea table, blogger's own.


It's made up of 6,187 pieces which technically makes it the eighth largest set ever released, although the number two slot is a Legends of Chima set that was a competition prize that was never available to the public, so that doesn't count.  And the number one largest set by piece count is 31203 World Map which does have over 11,600 pieces but the vast majority are 1x1 dots, so it only takes the title on a technicality.  So by any reasonable reckoning, the Razor Crest come in at number six in the all time biggest 'proper' sets.


Which is nice.


Certainly when it's built, you can see where all the pieces went.  It's a big beastie and it weighs a substantial amount.  Certainly enough that manual one has a picture of designer, César Soares, showing you how to lift it properly so that you a) don't knock any pieces off, and b) don't put your back out. (2) Also in the manual are pages that cover the design of the ship for the TV series.  In keeping with Star Wars traditions, wherever possible, models or full sized mock-ups were built, to keep CGI trickery to a minimum and there are a few photos of the ship and models in-situ.  The detailed interior of the Lego model is, understandably, not visible once completed and so a couple of pages are dedicated to showing which parts of the ship have been designed for easy removal so that if your friends, or maybe your significant other (3) ask to see inside, you can show them the intricate detail with a minimum of fuss.


Anyway - showing it off is all in the future.  First we have to build the thing!


Manual one covers the basic skeleton of the fuselage, book two adds some of the upper superstructure, number three adds much of the outer 'skin' and completes the tail of the ship while book four adds the enormous engines, the cockpit canopy, weapons and the information plaque.  The four books come in three cardboard sleeves, rather than the usual plastic bag, which helps to avoid dog-ears when the set is broken down and stored away.


The Build...


Construction starts, as these things often do, with a Technic skeleton, clad in grey plates and tiles.  It's not long before the outline of the hull starts to emerge, from the bluff, blunt-looking nose, through the practical, slab-sided central section of the ship, to the duck-tailed rear with its lowering cargo ramp.  Manual one also includes Din Djarin himself, and he's clad in Durasteel alloy armour, so presumably (SPOILER ALERT) the ship is positioned in the timeline before he gets his Beskar armour. (END SPOILER ALERT).


By the end of manual one, you have a build that is as robust as they come, and could be used to beat a Krayt Dragon into submission.  That said, along the way you have added a few interior details, including a Mandalorian helmet and jetpack.  This jetpack will fall off its mounting stud every time you pick the ship up and so do yourself a favour - put the jetpack aside and install it once the interior is complete to save yourself some grief.


Manual two moves on to the outer skin of the ship, and its worth taking some time to admire the skill of designer Soares.  Thanks to hinges, ball joints, ratchet joints and good old gravity, panels fit at angles that you wouldn't have thought possible.  It's not always immediately obvious how some of the large panels attach, and occasionally you'll have thought that something was sitting correctly, only to find a large panel gap when something else is attached later.  You then realise that a section needs to be shuffled up a few studs to create a seamless exterior.  Take your time and it all comes together nicely though.


Talking of which, one of the things that was pleasing was the fact that none of the bags contained a huge number of pieces, so each one was complete in around 20 - 30 minutes.  As such, the pre-sorting of parts (assuming you indulge in that sort of thing), never takes too long and so you always feel like you're making progress.


There are a few awkward moments with the second main section.  By this time, the body of the ship has become large, heavy and a little unwieldy.  So when you have to start constructing the landing gear, you find you're trying to attach a section with one hand, while trying to hold up the body with the other.  It's a tricky twenty minutes or so, but once the three 'feet' are complete the ship is rock solid once more.


Along the way, the bodywork has been adorned with its distinctive yellow stripes and paintwork, some of which consist of yellow tiles, the rest of stickers.  Fortunately the grey background of the stickers blends well with the tiles, and the yellow 'paintwork' on the stickers is designed to look scuffed, so as long as you get them approximately in the right place then the effect works quite well.


Stripes are a mixture of tiles and stickers 


More of the interior is put in place, including Grogu and his floating pram (and just behind him, the Frog lady's eggs - No!  Bad Grogu!) while further back are the weapons store (complete with amusing sign in the Star Wars common language of Aurebesh) and a couple of bounties, frozen in Carbonite.  Presumably when Djarin explained that he could "bring them in warm or bring them in cold" they opted for 'Chilled".


The next generation of the Frog family.  Or a light snack.


The third book is the thinnest of the four and puts two section of the uppermost superstructure in place.  This only takes up about half the book, and then the remainder is spent starting the huge crossmember that will support the engines.  It's a colourful process - it's all eventually going to be covered over in grey, so presumably using coloured elements just helps with clarity, but one particular step - 1154 if you're interested - caught my eye.  It involves three pieces, a 2x2 grey brick, a blue Erling brick (4) and a 1x1 green stud.


The green stud is attached to the 'face' of the Erling brick which is then, itself, faced into a cavity in the main structure.  As such the green stud has, at least structurally, no purpose whatsoever. It's repeated on the other wing of the build and having thought about it, there's only one logical solution I've been able to come up with.  The Erling brick needs to be placed thus, so that the cavity on the back of the brick is facing out.  When the instructions were being produced, I'm guessing that the creators felt it was too easy to misread that step and place the brick the wrong way round, so by using the green stud, it meant that you had to place the blue brick in the correct orientation.  The green stud was simply there to stop the builder making a silly mistake.


Given the complexity of this (and indeed, many other builds), I wonder why this particular step was picked on as needing to be 'idiot-proofed'?


On to the final book, and the skeleton of the engine structure is fleshed out.  While the central section, being flat, is relatively straightforward, with much of the build focusing on greebling and the creation of the escape pod, the two cylindrical engines are clad in a way that makes you stand back and want to applaud the skill of the designer.  The two engines are built up, panel by panel, using a variety of techniques to attach them, until you're left with a pair of virtually seamless units.


By comparison to the mighty engines, the canopy comes together quickly and settles into place, leaving only the twin, front-facing guns to finish off the model.  For something that looks (relatively) simple, each gun is another complex build with elements going up, down and outward before finally slotting into place via a couple of Technic pins.


Front facing cannons - a more complicated build than they look.


That done, it's just the plinth with the information plate before you can sit back and admire your handiwork.  The sticker (for me at least) went on straight and unlike many that have gone before it, doesn't appear to have any errors.  Alongside the infopanel there's room for Din Djarin himself if you haven't placed him in the cockpit, standing next to Grogu in his floating 'pram'.  Probably best to keep him out of the cockpit and away from those eggs.  At the other end of the plinth is Kuiil, riding a Bluurg and next to him, in a pair of handcuffs is The Mythrol, who Djarin is sent to capture early on in the series.


The completed model.  I had to put it in the garden to photograph it.


The view from above.


The not-entirely-accessible rear ramp.


This does not do justice to the size.


Nice little insider joke on the sign.  If you know your Aurebash. 


Escape pod.  Hope you never need it.


Side view.  That tail looks like there's something missing.  (There isn't.)


Mando and Grogu.


Hold your breath when applying sticker.


Kuiil and The Mithrol.  Bad Mithrol.


o  o  o  o  o


The above was written, shortly after I built the Razor Crest, back in March 2023.  It's now a year on and I'm just getting around to publishing it.  I think next time I update my CV, Procrastination should probably go on my list of skills.  Somewhere near the top.  If I ever get round to it...


But it has given me the opportunity to reflect on the set, as it sat out on display for six months or more (when we got to Christmas the management insisted it was dismantled).  Sadly was 'displayed' at ankle level though - my wife has firm opinions on what gets the top shelf of the display unit and apparently family photos beat 'some big ugly Lego thing' every time.


As such, I can offer these observations.


1.  It's big.  Really big. (Cue Douglas Adams quote about 'You may think it's a long way...')


2. While the model accurately represents the Razor Crest, it's not a particularly attractive thing to look at - function has definitely taken precedence over form, and as such, is not as eye catching or pleasant to look at as, say, the UCS Millennium Falcon.  The fact that, a few yellow stripes aside, the whole thing is one mass of 'Star Wars grey' does not help.


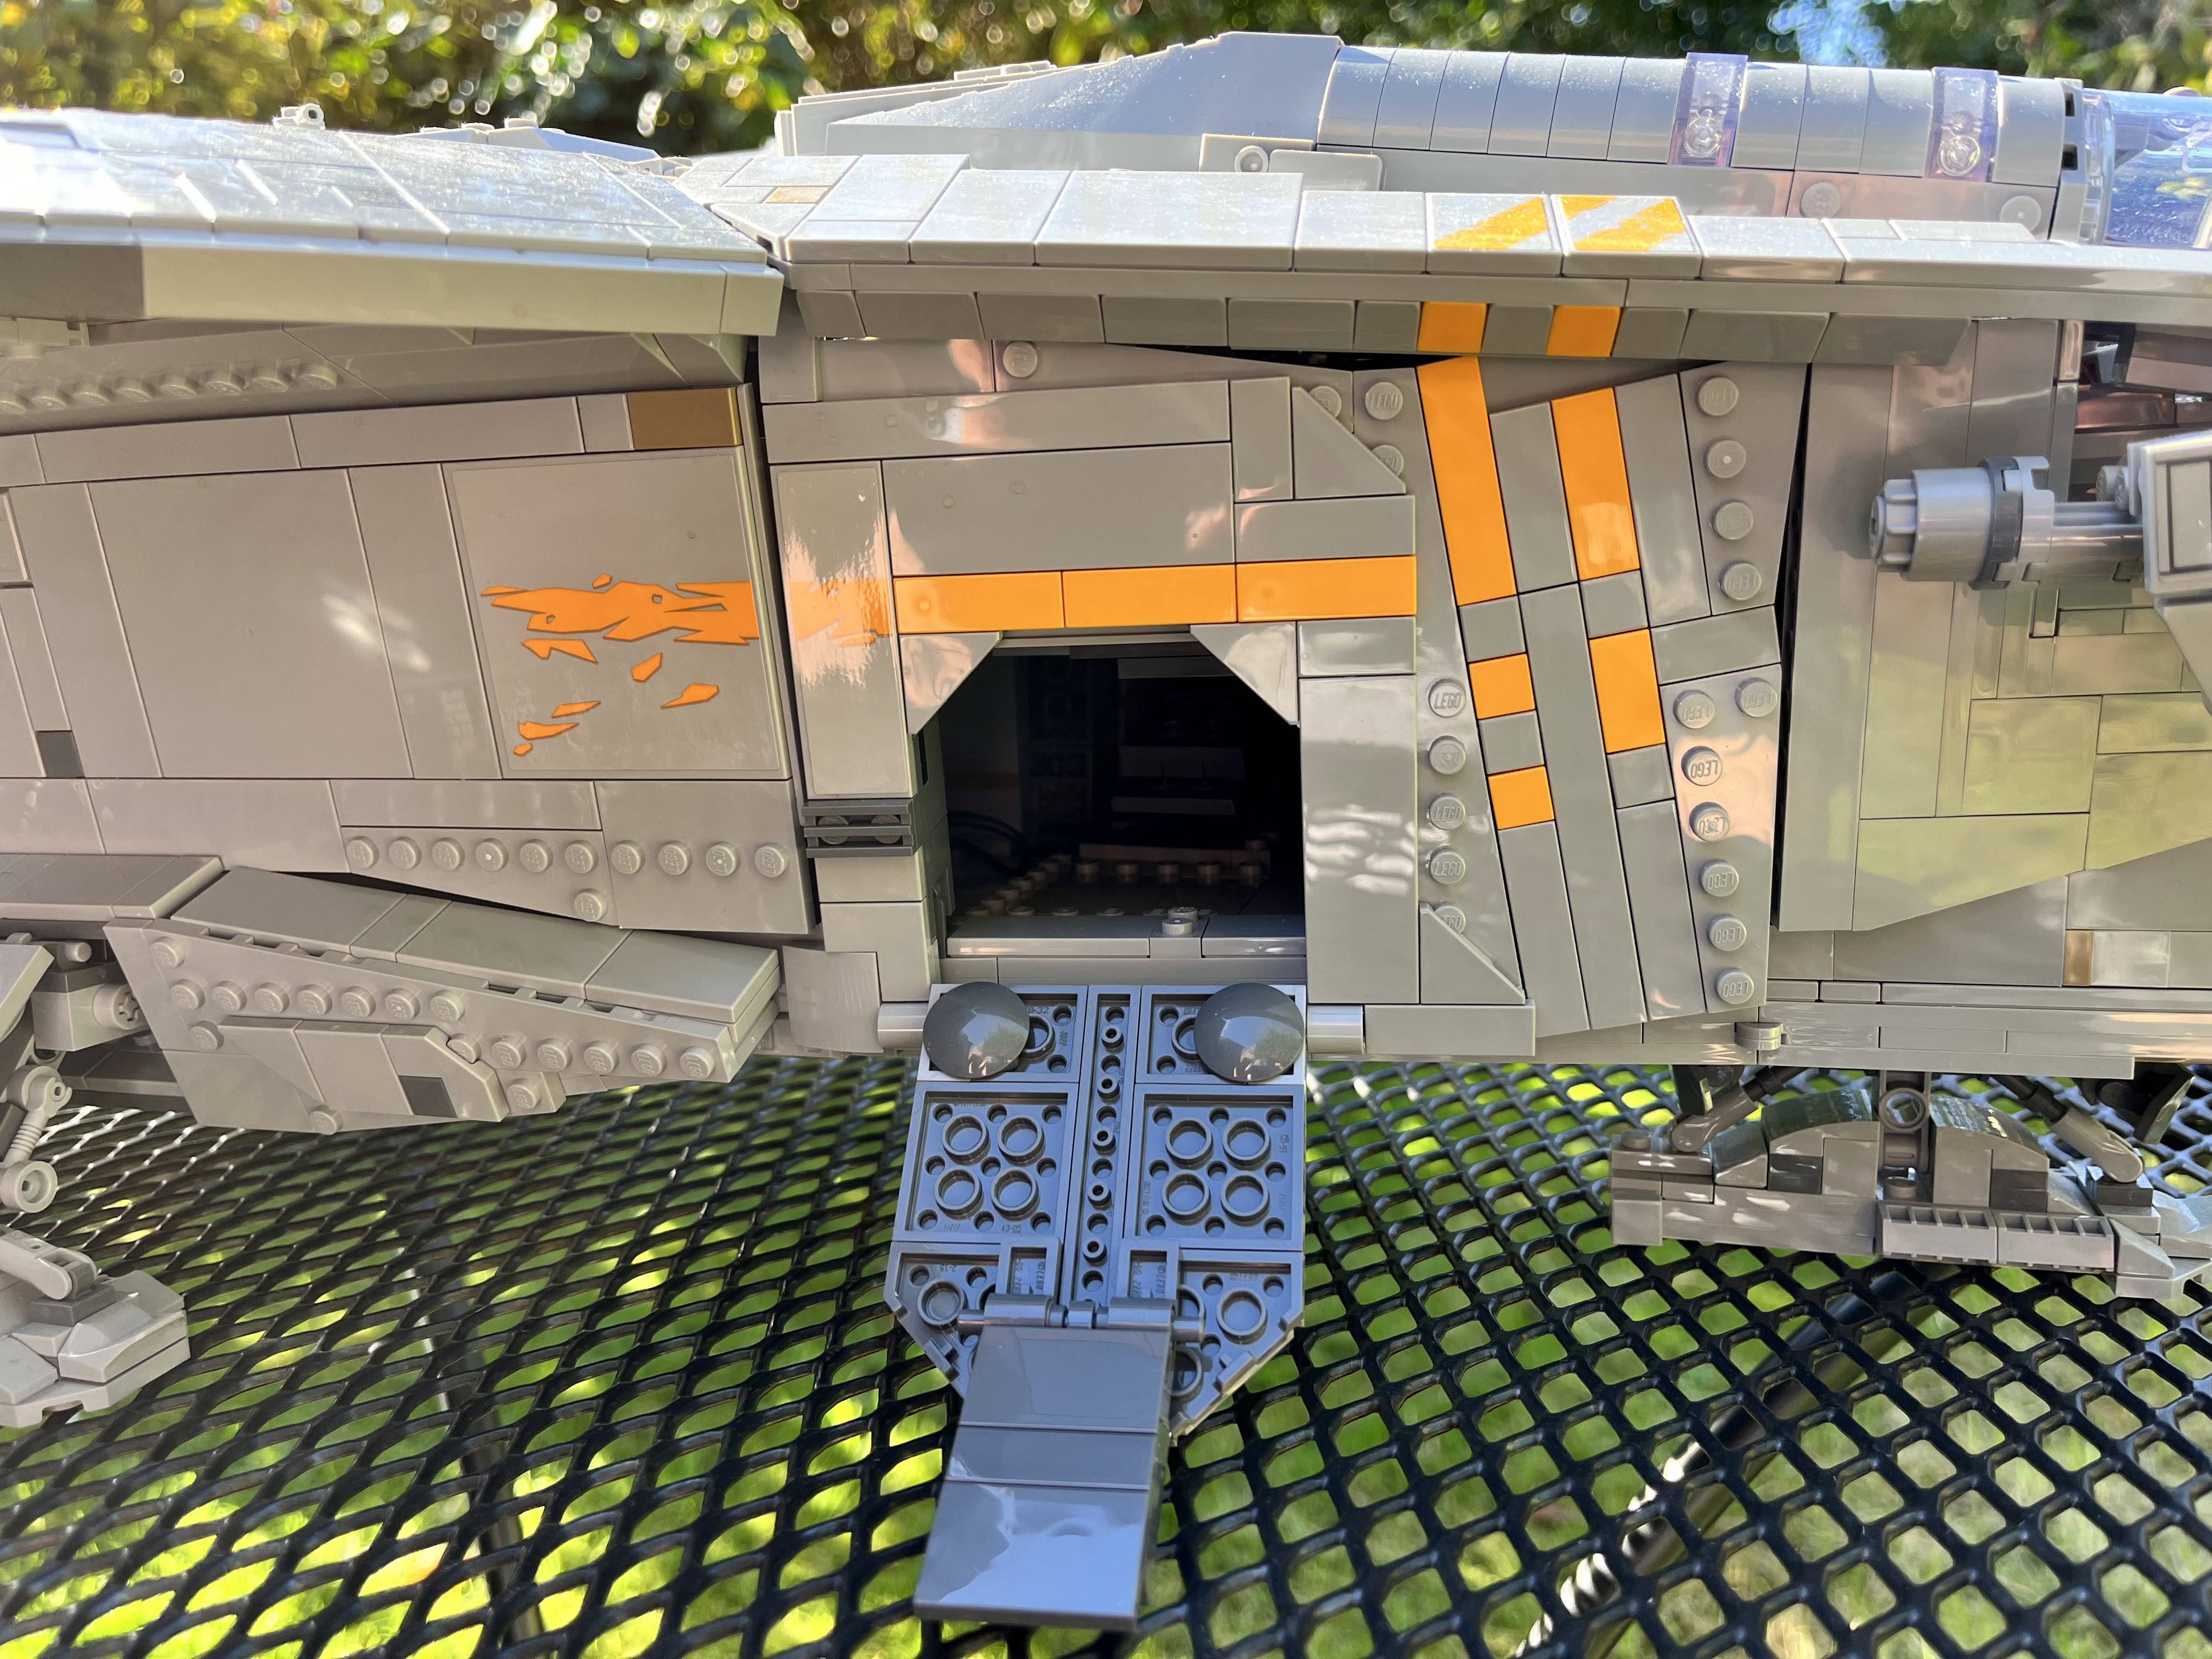
3. As with many of the big UCS sets, there's a fair bit of time (and parts) given over to creating a detailed interior which will, in my experience, never get looked at.  The cover for the cockpit is easily removable and so you may occasionally go and have a peer in there.  The rest of it though?  The two side doors on the sides of the main hull open revealing... very little.  The ramp in the tail drops down revealing... even less (and that's if you can get a fingernail into the gap to actually pull the ramp down in the first place.  There are a few scant details to be seen if you lift the massive engine assembly off, but depending on where you have it displayed, that may not always be practical.  There are parts inside cupboards and storage areas that will simply never be seen again, other than during the build process.  It's nice for a fleeting moment, but after that...  You have to wonder whether it's worth it.


4. It is, as with many big Lego sets, fragile.  While the superstructure is tough as old boots, the greebling - and the main, forward facing, laser cannons in particular - are prone to take damage any time anyone brushes up against it, so if you're going to display it, try and keep it away from passing bodies or meddling fingers.


Final thoughts


For all my grumbles, it's a fine set.  Is it worth £520?  I'm going to say, probably not, but if you can find it on sale somewhere with a 15 - 20% discount - and if big Star Wars sets are your thing - then I'd say that was the time to pull the trigger.  The value, to my mind, is in the build rather than the display.  It has almost zero play value - you'd need arms like tree trunks to 'swoosh' it, so once it's built it's just going to sit out on display and, as previously mentioned, it doesn't have long term 'Ooh!' value.


If you've got the space to have a collection of sets out on view, then this will slot right in, but as a solo show piece I'd say it's got limited value.


So if you can afford it, take your time, enjoy the build, drink in the interior details while you can then put it out for friends an family to admire.  But start thinking about what's going to replace it, sooner rather than later.


~ ~ ~ ~ ~ ~ ~ ~ ~ ~ ~


1. Shiny day.  It's a thing.  At Lucasfilm.  Probably.


2. A serious risk at my age. 


3. In my experience, you'll be waiting a long time for this to occur.


4. The Erling brick was created by designer Erling Dideriksen in 1979 and was one of the first elements that allowed a builder to 'rotate' the build through 90 degrees and thus contributed to the growth of SNOT, or Studs Not On Top building.

Thursday 16 March 2023

"So you want to build a LEGO City but don't have the space? Maybe Micropolis is the answer."

You don't have to be a part of the Lego community for too long before you start coming across Lego cities.  In some cases, small children create random buildings from whichever bricks fall to hand, and cars drive along roads made of living room carpet.  In the UK, where space is often at a premium, a city may be a few skilfully designed buildings, or maybe it's a collection from the Modular series sitting on a shelf.  But across the pond, where everything is bigger, including spare rooms and basements, is where you'll find the epic layouts that can stretch 20 or 30 feet in both directions, usually built on tables so that their creators can crawl underneath and pop up in cut out areas to access the city centre.


One such layout is New Jang City, the creation of popular YouTuber, JangBricks.


Image: JangBricks


A fantastic looking city, but I dread to think of the cost!


But what if you crave a sprawling Lego metropolis, but don't have the acres of space (and indeed the thousands of bricks) that such an undertaking requires?  That's something that's been on my mind for some time, as I'm most envious of the fabulous layouts with city centres, shopping districts, suburban areas, ports, airports and more.  But I simply don't have the space.  However,  maybe there's an alternative...


A little while back, I came across TwinLUG.  TwinLUG is the Twin Cities Lego User Group, based in the Twin Cities in the USA.  If, like me, you've vaguely heard of the term 'Twin Cities' but can't place it (them?), it refers to the area around the confluence of the Mississippi, Minnesota and St Croix rivers in the state of Minnesota (1).  The 'Twin Cities' refers to the two largest cities in the vicinity: Minneapolis and St Paul. (2)


Back in 2010, they published what they called the "Micropolis" Micro City Standard.  Now I doubt whether they'd claim to be the first to build Lego cities at a micro scale, but they decided to create some guidelines that would allow their various members to create city blocks separately, but which would fit together as an integrated whole.  I liked this idea, and, despite being someone who is largely MOC-averse, I thought I'd give it a go.


Here are a couple of the group's creations...


Both images (c) their respective owners, with my thanks to the TwinLUG Flickr group


So I went off to BrickOwl, ordered up a few parts and they arrived a while back.  At which point I promptly forgot about them!  But having just come across the link to the TwinLug page again, I'm going to dig the parts out, put my town-planning hat on and become the Lord Of All I Survey.


After I've build the UCS Razor Crest which I just managed to pick up at a bargain price!


But just going back to the Micropolis standard, as you'll see if you click through on the above link, it works on the basis that one 16x16 plate is a quarter of a city block.  Two 16x16 plates are the bread in a Lego sandwich, and Technic bricks plus some regular System bricks, are used in the 'filling' to allow each build to be clipped to its neighbour.  There are rules for where the sidewalk (or 'pavement' for our UK readers) go, but the remainder of the block is then free for you to begin construction.


If you want an idea of the sort of thing that can be built at this scale, TwinLUG have a Flickr page dedicated to Micropolis, and you can see some of their fantastic creations, here.


Before I went off to BrickOwl to order the parts I thought I'd need, I assumed (3) that 16x16 plates would be common as muck and therefore cheap as chips (4).  Not so!  A few sellers have one or two for sale at around £1.29, but if you're buying in bulk - each quarter block requires two plates, although you could probably skimp on the bottom plate if you were only connecting to your own build - the price jumps a bit.  Forty plates would set you back over £110, and that's before shipping.


As such I've only bought enough for about two full blocks, but I guess that's enough to see if the bug bites.  I shall start construction soon.


But that's after the aforementioned Razor Crest, ill-fated (5) ship of Din Djarin, gets built.  I have a bad habit of buying these larger sets and then 'putting them away for later'.  Not this one!  This one get's built.  Look out for a review, soon!


~ ~ ~ ~ ~ ~ ~ ~ ~ ~ ~


1. Minnesota is up the top, butted up against Canada, roughly in the middle (East to West-wise) of the USA.


2. Thank you, Wikipedia.


3. Never a good idea.  As they say, 'it makes an ass out of U and Me'.


4. Other similes are available.


5. Sorry.  Belated spoiler alert!

Wednesday 1 March 2023

"So is this a ten second car?" Review: Lego Speed Champions 76917 2 Fast 2 Furious Nissan Skyline GT-R (R34)


76917 Lego Speed Champions 2 Fast 2 Furious Nissan Skyline GT-R (R34)


The Fast & The Furious is a divisive franchise.  To some it's just chewing gum for the brain and candy for the eyes with virtually no redeeming features at all.  Corny dialogue, ridiculous cars and plots that have jumped an entire shiver (1) of sharks (2), it's Hollywood hokum writ large.

For others it's adrenaline-fuelled escapism at its finest; a film franchise that started out with a semi-serious thriller which then screamed - at about 150mph, and with a more-than-feasible number of gear changes - into a series of tongue-in-cheek, global scale heist movies via at least one questionable diversion (Tokyo Drift, I'm looking at you) (3), all shot through with a rich seam of automotive porn.


But with ten films in the series, plus one spin-off, and global takings of over six-and-a-half billion dollars though, you have to conclude that someone out there likes these films.


Me?  I love 'em! 


So when, in 2022, the Lego Group - specifically, theme lead, Chris Stamp -  decided to expand the Speed Champions range and delve into the cinematic world for some inspiration, they picked two of the biggest sagas to begin with - James Bond and Fast & Furious.  Thus it was that we got 76911 007 Aston Martin DB5 and 76912 Fast & Furious 1970 Dodge Charger R/T.  Interestingly (to me, anyway), both of these cars had already been released at a larger scale, and in both cases, the prevailing opinion was that the Speed Champions versions were a signifiant improvement on their predecessors.


Back in 2018, 10262 James Bond Aston Martin DB5 appeared as part of the Creator Expert line, and for £130 you got a fairly blocky, slab-sided car that looked somewhat boss-eyed.  Dom's Dodge Charger, meanwhile, showed up two years later in the Technic range as set no 42111.  I can't speak for anyone else, but I've been serious about Lego collecting and building for eleven years now and this is, by a country mile, the worst set - of any theme - that I've ever owned.  The build is grim, with parts having to be added to the interior after the roof has gone on, requiring fingers that are both small and double-jointed.  It makes little use of Technic as a medium - there are few traditional Technic functions and the 'wheelie stand' is faintly ridiculous.  Worst of all, the finished model looks awful.  Compare this to 10265 Ford Mustang and 10304 Chevrolet Camaro Z/28 1969 from the Creator Expert / Icons theme, which are utterly gorgeous, and you can only wonder what might have been.


The blocky, bug-eyed DB5


Dom's Dodge Charger - dodge it indeed!


The Charger at Speed Champions scale - much improved


A DB5 as it should be - curvy!


The Ford Mustang - possibly the prettiest Lego car ever.


If you've got the Mustang, you have to buy the Camaro!


But ever since Dom's considerably better looking Charger appeared in its Speed Champions guise, fans of the series have been clamouring for a minifigure of Mr Toretto's partner-in-crime, Brian O'Connor, and a set of wheels for him to drive.  And for most, there was only ever one choice of car.


Brian, as portrayed by the late and much lamented Paul Walker, has driven many, many vehicles in the series.  The first film has the lurid green Mitsubishi Eclipse that he rolls up to his first race in, and the bright orange Toyota Supra which he hands over to Dom, as he owes him ' a ten second car'.  In later films, he drives classics such as a Mk I Ford Escort RS2000, a number of Nissan GT-R35's and the Toyota Supra Turbo that marks his farewell from the franchise (it's ok to cry), but the star of the show was always going to be the car connoisseur's car - the Nissan Skyline GT-R 34 from the bordering-on-slapstick 2 Fast 2 Furious.  You can see how he found the car, turned it into a street racer and ended up in Miami, here.


And that grey Skyline is the one that Lego, thankfully, chose.  Have they got it right?  Is it a street racing hero or a Saturday-night-in-Tesco's-car-park dud?  Let's take a look...


Opening the box we get two bags of parts, numbered (unsurprisingly) 1 and 2, a chassis element and a sheet with - count 'em - 23 stickers.  To be fair, anyone who has built a Speed Champions set will know that a high sticker count is par for the course and is usually worth the effort and frayed nerves that it takes to get them on straight.  Some people choose to ignore the stickers on sets but that would look a little odd with the Skyline.  While many of the stickers are replicating things like indicators, badges, dials and gauges, there are some sizeable ones that create the blue stripes down the side of the car.  Because not even the Lego Group is harsh enough to ask builders to try and line up a couple of stickers on the curved rear wheel arches, these element are printed, so you really do need to apply at least the stripes.  And if you're going to put them on, you may as well go the whole hog, right?  Trust me, it's worth it.


But before you reach for the sticker sheet though, or indeed the car itself, first you have the minifigure of Brian O'Connor, as played by Paul Walker.  It's a simple minifig, with regular grey legs and a torso that represents a crinkled white t-shirt.  The printing covers both the back and front, and additionally, the arms are dual printed to represent the sleeves of the shirt.  The head only has one face print, which is somewhere between 'smug' and 'concentrating'.  It also has some 'designer stubble' (4) which fits with O'Connor's on-screen look.  The hair looks a little too 'bouffant' though, although the colour is a pretty good match.  On the whole, though, not bad at all.


Brian 'Big hair' O'Connor


On to the car itself, and it's something of a Curate's egg, that is to say, good in parts.  Although 'excellent in parts with just a few let downs' is probably closer to the mark.


The colour scheme of blue and grey is absolutely on the money when compared to the original which is pictured on the back of the box. The designer has done a fantastic job with the extremities of the car - both the nose and the tail are remarkable in the way they mimic the big Nissan.  The front grille, with the iconic GT-R badge, the front splitter, the brick built stripes and in particular the use of smoky clear 1x1 wedges to replicate the headlights are a joy to behold.  Similarly, at the rear of the car, the use of minifigure neck brackets to cover a trans-red piece, just leaving the stud visible is an ingenious way to create the two smaller rear lights.  The big rear wing, made from just a handful of parts is maybe a little chunky compared to the source material, but we're just quibbling now.  A fat silvered exhaust pipe and a couple of stickers representing the numberplate and the Toyo Tires (5) logo round out a neat back end.


The Skyline from the front...


...and from the rear.  Love those lights!


Talking of equipment and manufacturer's logos, Brian's GT-R has a line of them down the left hand side of the bonnet, from HKS to Sparco via JBL and a whole bunch of others that I don't recognise.  These are conspicuous by their absence, as the top surface of the front wings are left as exposed studs rather than a smooth surface that could have had a sticker applied.  Whether this was a conscious design choice, or whether it was just going to be too much time and money to agree all the various licensing deals I don't know.  It's a minor omission at the end of the day that most people won't worry about.  


Meanwhile the interior is packed with detail.  A printed seat element, stickers galore representing dials and gauges, a roll cage and three canisters of nitrous oxide for that all important Millennium Falcon-style hyperspace boost.  The cabin is completed with a smoked glass windscreen and rear glass, although faking the rear quarter lights with black stickers spoils the look a little.  Again - minor niggles. Some trans-blue tiles under the chassis that hint at the under car lighting are a neat finishing touch.


So far, so good.  In fact there's not much to complain about at all, other than the bonnet.  The R34 has a very distinct sloping bonnet.  It has a high boot lid, and from there the car's lines taper down slightly along the tops of the doors before diving down to the headlights at a pronounced angle.  The designer has jacked the rear axle up by a plate to give a subtle lift to the back of the car, but there's nothing that can be done about the ruler-flat bonnet.  To an interested bystander it's not a problem at all, but to the many people buying this set because they're fans of the original car, it's going to stick out like a sore thumb.  To be fair, at this scale there's very little that can be done to remedy it.  Having a look online, there are a good number of MOCs and modifications which achieve varying degrees of success, but none (that I've seen) successfully replicate the bonnet.


Let's just hope for a LEGO Icons version at the Mustang / Chevrolet scale at some point in the future.  Now that would be a day one purchase!


Nice underskirt neon!  Shame about the flat bonnet!


The original in all it's over-the-top glory!


Overall, then, a great set, which will sit happily alongside Dom's Dodge Charger (6) and, at less than £20, represents something of a bargain.  Which isn't something you get to say about Lego sets very often these days.  It's a fun build - around 90 minutes if you're taking your time to line those stickers up properly.  Some interesting build techniques as we've come to expect from the Speed Champions range and a finished model that looks plain cool.


Highly recommended.


~ ~ ~ ~ ~ ~ ~ ~ ~ ~ ~


1. I assumed it would be a 'school' of sharks, and according to some sources it it, but apparently a 'shiver' is also a valid collective name.


2. In case you're unfamiliar with the term, 'jumping the shark' is generally regarded as the point at which a popular TV series or film tries something utterly ridiculous in an effort to retain viewing figures.  It originates from the US TV Series 'Happy Days' when the Fonz jumps over a shark on waterskis.  To clarify - the Fonz is on waterskis, not the shark.  You can read about it here.


3. Though it did introduce fan favourite, Han, so it's not all bad.


4. Is designer stubble still a thing?


5. I know it ought to be spelled with a 'Y'.  It's an American thing.


6. No, they never appeared on screen together, but it matters not.